Want to know how your e-mail queue's are piling up?
# Script: QueueReport.ps1
# Purpose: This script can be set as a scheduled task to run every 30minutes
# and will monitor all exchange 2010 queue's. If a threshold of 10 is met an
# output file with the queue details will be e-mailed to all intended admins
# listed in the e-mail settings
# Author: Edwin van Brenk
# Date: 12-2013
$data = Get-ExchangeServer | Where { $_.isHubTransportServer -eq $true } | get-queue | Where-Object { $_.MessageCount -gt 10 } | FT -Wrap -autosize
$report = $data
$smtpServer = “smtp.domain.lan”
$message = new-object Net.Mail.MailMessage
$smtp = new-object Net.Mail.SmtpClient($smtpServer)
$message.From = “Queue-Alert@domain.com”
$message.To.Add("admin1@domain.com")
#$msg.To.Add("admin2@domain.com")
$message.Subject = “CAS SERVER QUEUE THRESHOLD REACHED - PLEASE CHECK EXCHANGE QUEUES”
$message.Body = ( $report | out-string )
$smtp.Send($message)
19 December 2013
ActiveSync connection report
I wanted to get more info on our active sync devices and any errors that may occur.
So after a trip down the Micrsoft Script gallery i came across this: ActiveSyncReport.PS1
Just what i was looking for.
After adjusting some parameters, i created an email report to show me the activesync devices that had more than 1000 connections to the CAS-HUB servers from the internet from the day before.
Which looks something like this:
# Current date minus 1 day
$Date = (get-date (get-date).Adddays(-1) -Format "dd-MM-yyyy")
$LogparserExec = "C:\Program Files (x86)\Log Parser 2.2\LogParser.exe"
$ActiveSyncOutputFolder = "D:\Temp\ASoutput"
$IISLogs = "\\sr-xxxx\d$\IISLogs\w3svc1\","\\sr-xxxx\d$\IISLogs\w3svc1\"
$SMTPServer = "smtp.domain.lan"
$SMTPSender = Activesync@domain.com
$SMTPRecipient = "username1@domain.com","username2@domain.com"
$SendEmailReport = $true
$HTMLReport = $true
$MinimumHits = 1000
And finally send the email:
Send-MailMessage -To $SMTPRecipient -From $SMTPSender -SmtpServer $SMTPServer -Subject "Exchange ActiveSync Report $Date $title" -BodyAsHtml $body

I changed some parameters to functions so it is easier to generate the same report every day.
Otherwise i would have to change the date every time i wanted to generate the report.
The script itself can be found here
The full description and examples can be found here
So after a trip down the Micrsoft Script gallery i came across this: ActiveSyncReport.PS1
Just what i was looking for.
After adjusting some parameters, i created an email report to show me the activesync devices that had more than 1000 connections to the CAS-HUB servers from the internet from the day before.
Which looks something like this:
# Current date minus 1 day
$Date = (get-date (get-date).Adddays(-1) -Format "dd-MM-yyyy")
$LogparserExec = "C:\Program Files (x86)\Log Parser 2.2\LogParser.exe"
$ActiveSyncOutputFolder = "D:\Temp\ASoutput"
$IISLogs = "\\sr-xxxx\d$\IISLogs\w3svc1\","\\sr-xxxx\d$\IISLogs\w3svc1\"
$SMTPServer = "smtp.domain.lan"
$SMTPSender = Activesync@domain.com
$SMTPRecipient = "username1@domain.com","username2@domain.com"
$SendEmailReport = $true
$HTMLReport = $true
$MinimumHits = 1000
And finally send the email:
Send-MailMessage -To $SMTPRecipient -From $SMTPSender -SmtpServer $SMTPServer -Subject "Exchange ActiveSync Report $Date $title" -BodyAsHtml $body
I changed some parameters to functions so it is easier to generate the same report every day.
Otherwise i would have to change the date every time i wanted to generate the report.
The script itself can be found here
The full description and examples can be found here
10 December 2013
Send email using Telnet
This one comes from Paul Cunningham, and as he states this is indeed need to know stuff.
So bookmark this or Paul's page.
This is one of the essential troubleshooting tricks that an Exchange administrator needs to know, sending an email using Telnet from the command line.
Let’s say you’ve just configured a relay connector and want to test it from the server that you wish to allow relay from before you let that server’s owner know that it is all set up for them. Or perhaps you want to quickly test whether a another email server on the internet is accepting mail from your network.
For just about any scenario where you want to quickly test SMTP knowing this method is very useful.
Note: this technique requires the Telnet client to be installed on the computer you’re running the test from. For Windows XP and Windows Server 2003 it will already be installed, but Windows 7 and Windows Server 2008 need to install it first.
If Telnet is able to connect to the remote server you should see its welcome banner.
The first command to send is the HELO command. Some email servers will accept HELO on its own, others will require you to also provide a host or domain name along with it.
Next use the MAIL FROM command to tell the remote server who the email is from.
Now use the RCPT TO command to tell the remote server who to deliver the email to.
The final step for the bare minimum set of commands is the DATA command.
If you just want to send a blank message type a period “.” and press enter. Otherwise you can set a subject line for the message if you like. Use SUBJECT and then type your subject line, and press enter.
Type any text you want to include with the message, press enter, and then finally type a period “.” and press enter to send the email.
If the message was queued for delivery then it has been accepted by the server. If this is an Exchange server that you control then you can use message tracking to troubleshoot further if the message doesn’t make it to the inbox that you were expecting.
Type the QUIT command to terminate the connection when you’re done.
250 is a good thing, and there are a lot of other SMTP status codes you’ll encounter the more you use this technique. For example an email server may deny your attempt to relay mail between two domains.
Or you may encounter an email server that is explicitly blocking email from your domain.
There are a lot of different scenarios you might encounter here, and thankfully the SMTP status codes will help you troubleshoot them.
Now that you understand how to send email using Telnet and the command line I hope you find this technique very useful in the future.
So bookmark this or Paul's page.
This is one of the essential troubleshooting tricks that an Exchange administrator needs to know, sending an email using Telnet from the command line.
Let’s say you’ve just configured a relay connector and want to test it from the server that you wish to allow relay from before you let that server’s owner know that it is all set up for them. Or perhaps you want to quickly test whether a another email server on the internet is accepting mail from your network.
For just about any scenario where you want to quickly test SMTP knowing this method is very useful.
Note: this technique requires the Telnet client to be installed on the computer you’re running the test from. For Windows XP and Windows Server 2003 it will already be installed, but Windows 7 and Windows Server 2008 need to install it first.
Installing the Telnet Client for Windows 7
To install the Telnet client on a Windows 7 computer use these steps.- Open the Control Panel
- Click on Programs
- Click on Turns Windows Features on or off
- Scroll down the list until you see Telnet Client, and tick that box
- Click OK and close the Control Panel
Installing the Telnet Client for Windows Server 2008
To install the Telnet client on a Windows Server 2008 computer open a command prompt and run the following command.C:\>servermanagercmd -i telnet-client
.........
Start Installation...
[Installation] Succeeded: [Telnet Client].
Success: Installation succeeded.
Installing the Telnet Client for Windows Server 2008 R2
To install the Telnet client on a Windows Server 2008 R2 computer open a PowerShell window and run the following command.PS C:\> Import-Module servermanager
PS C:\> Add-WindowsFeature telnet-client
Success Restart Needed Exit Code Feature Result
------- -------------- --------- --------------
True No Success {Telnet Client}
Sending Email from the Command Line via Telnet
Open a command prompt and use Telnet to connect to the remote email server on port 25.C:\>telnet esp-ho-ex2010a 25
If Telnet is able to connect to the remote server you should see its welcome banner.
220 ESP-HO-EX2010A.exchangeserverpro.net Microsoft ESMTP MAIL Service ready at T ue, 9 Aug 2011 22:00:04 +1000
The first command to send is the HELO command. Some email servers will accept HELO on its own, others will require you to also provide a host or domain name along with it.
helo test.com
250 ESP-HO-EX2010A.exchangeserverpro.net Hello [10.0.1.11]
Next use the MAIL FROM command to tell the remote server who the email is from.
mail from: test@test.com
250 2.1.0 Sender OK
Now use the RCPT TO command to tell the remote server who to deliver the email to.
rcpt to: alan.reid@exchangeserverpro.net
250 2.1.5 Recipient OK
The final step for the bare minimum set of commands is the DATA command.
data
354 Start mail input; end with .
If you just want to send a blank message type a period “.” and press enter. Otherwise you can set a subject line for the message if you like. Use SUBJECT and then type your subject line, and press enter.
subject: this is a test message
Type any text you want to include with the message, press enter, and then finally type a period “.” and press enter to send the email.
sending a test message via telnet
.
250 2.6.0  [InternalId=320] Queued mail for delivery
If the message was queued for delivery then it has been accepted by the server. If this is an Exchange server that you control then you can use message tracking to troubleshoot further if the message doesn’t make it to the inbox that you were expecting.
Type the QUIT command to terminate the connection when you’re done.
SMTP Status Codes
You may notice along the way that after typing commands you see responses from the server starting with “250″.250 is a good thing, and there are a lot of other SMTP status codes you’ll encounter the more you use this technique. For example an email server may deny your attempt to relay mail between two domains.
550 5.7.1 Unable to relay
Or you may encounter an email server that is explicitly blocking email from your domain.
554 5.1.0 Sender denied
There are a lot of different scenarios you might encounter here, and thankfully the SMTP status codes will help you troubleshoot them.
Now that you understand how to send email using Telnet and the command line I hope you find this technique very useful in the future.
09 December 2013
Create shared mailbox with RES Automation Manager and Powershell
I created a script for our servicedesk that can create a shared mailbox in combination with RES Automation Manager.
Normally our servicedesk support staff can't create a shared mailbox because of the limited rights they have in our environment. Shared mailboxes can only be created with powershell and Organization Management rights.
The script runs as a "Module" in RES AM.
There are 2 variables that need to be entered:

The 2 variables:
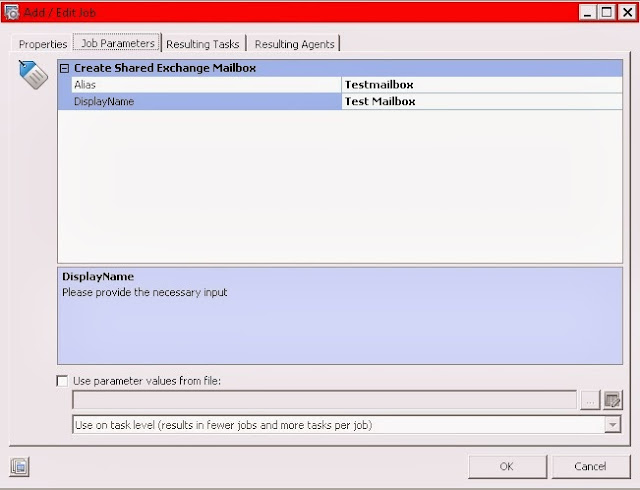
The sharedmailbox "Testmailbox" has been created in the OU domain.lan\Central\Accounts\Shared Mailboxes, and the login has been disabled. (by default for a shared mailbox)
A group for the shared mailbox "Testmailbox" has been created in the OU domain.lan\Central\Accounts\Groups\Shared Mailboxes with the name; g.f.mail.Alias (g.f.mail.testmailbox)
The new group is added to the shared mailbox with "Full Access" permissions and "Send as" permissions.
The only thing that has to be done by hand, is add the opropriate users to the new "Testmailbox".
The script:
param ($Alias,$DisplayName)
add-pssnapin Microsoft.Exchange.Management.PowerShell.E2010
import-module activedirectory
# Setup variables
$DomainController="sr-XXXXX.domain.lan"
$OU='domain.lan/Central/Accounts/Shared Mailboxes'
$UPNdomain = "@domain.com"
if ($Alias)
{
if ($Alias.Contains('@')) { $Alias = $Alias.Substring(0,$Alias.IndexOf('@')) }
$AliasMailbox = Get-Mailbox $Alias -ErrorAction SilentlyContinue
$AliasMailUser = Get-MailUser $Alias -ErrorAction SilentlyContinue
if ($AliasMailbox -or $AliasMailUser)
{
Write-Output "The Alias specified already exists."
$Alias = $null
}
}
while (!$Alias)
{
$Alias = Read-Host -Prompt "Alias"
if ($Alias)
{
if ($Alias.Contains('@')) { $Alias = $Alias.Substring(0,$Alias.IndexOf('@')) }
$AliasMailbox = Get-Mailbox $Alias -ErrorAction SilentlyContinue
$AliasMailUser = Get-MailUser $Alias -ErrorAction SilentlyContinue
if ($AliasMailbox -or $AliasMailUser)
{
Write-Output "The Alias specified already exists."
$Alias = $null
}
}
}
if ($DisplayName)
{
$DisplayNameMailbox = Get-Mailbox $DisplayName -ErrorAction SilentlyContinue
$DisplayNameMailUser = Get-MailUser $DisplayName -ErrorAction SilentlyContinue
if ($DisplayNameMailbox -or $DisplayNameMailUser)
{
Write-Output "The Display Name specified already exists."
$DisplayName = $null
}
}
while (!$DisplayName)
{
$DisplayName = Read-Host -Prompt "Display Name"
if ($DisplayName)
{
$DisplayNameMailbox = Get-Mailbox $DisplayName -ErrorAction SilentlyContinue
$DisplayNameMailUser = Get-MailUser $DisplayName -ErrorAction SilentlyContinue
if ($DisplayNameMailbox -or $DisplayNameMailUser)
{
Write-Output "The Display Name specified already exists."
$DisplayName = $null
}
}
}
#Alias to lower
$Alias=$Alias.ToLower()
# Set UPN
$UPN=$Alias + $UPNDomain
Write-Output "Creating Shared Mailbox"
New-Mailbox -Name:$Alias -Alias:$Alias -DisplayName:$DisplayName -OrganizationalUnit:$OU -UserPrincipalName:$UPN -SamAccountName:$Alias -Database:$MailboxDatabase –Shared –DomainController $DomainController
Sleep 10
Write-Output "Creating Security Group"
New-ADGroup -Name "g.f.mail.$Alias" -SamAccountName g.f.mail.$Alias -GroupCategory Security -GroupScope Global -DisplayName "g.f.mail.$Alias" -Path "OU=Shared Mailboxes,OU=Groups,OU=Accounts,OU=Central,DC=domain,DC=lan" -Description "Group for shared mailbox $Alias"
Write-Output "Setting Mailbox Permissions"
sleep 50
Add-MailboxPermission –Identity: $Alias –AccessRights:FullAccess –user:"g.f.mail.$Alias"
Add-ADPermission –Identity: $Alias –user:"g.f.mail.$Alias" –ExtendedRights: 'Send-as'
Normally our servicedesk support staff can't create a shared mailbox because of the limited rights they have in our environment. Shared mailboxes can only be created with powershell and Organization Management rights.
The script runs as a "Module" in RES AM.
There are 2 variables that need to be entered:
- The shared mailbox Alias
- The shared mailbox description

The 2 variables:
When the job has run successfully the following has happened:
A group for the shared mailbox "Testmailbox" has been created in the OU domain.lan\Central\Accounts\Groups\Shared Mailboxes with the name; g.f.mail.Alias (g.f.mail.testmailbox)
The new group is added to the shared mailbox with "Full Access" permissions and "Send as" permissions.
The only thing that has to be done by hand, is add the opropriate users to the new "Testmailbox".
The script:
param ($Alias,$DisplayName)
add-pssnapin Microsoft.Exchange.Management.PowerShell.E2010
import-module activedirectory
# Setup variables
$DomainController="sr-XXXXX.domain.lan"
$OU='domain.lan/Central/Accounts/Shared Mailboxes'
$UPNdomain = "@domain.com"
if ($Alias)
{
if ($Alias.Contains('@')) { $Alias = $Alias.Substring(0,$Alias.IndexOf('@')) }
$AliasMailbox = Get-Mailbox $Alias -ErrorAction SilentlyContinue
$AliasMailUser = Get-MailUser $Alias -ErrorAction SilentlyContinue
if ($AliasMailbox -or $AliasMailUser)
{
Write-Output "The Alias specified already exists."
$Alias = $null
}
}
while (!$Alias)
{
$Alias = Read-Host -Prompt "Alias"
if ($Alias)
{
if ($Alias.Contains('@')) { $Alias = $Alias.Substring(0,$Alias.IndexOf('@')) }
$AliasMailbox = Get-Mailbox $Alias -ErrorAction SilentlyContinue
$AliasMailUser = Get-MailUser $Alias -ErrorAction SilentlyContinue
if ($AliasMailbox -or $AliasMailUser)
{
Write-Output "The Alias specified already exists."
$Alias = $null
}
}
}
if ($DisplayName)
{
$DisplayNameMailbox = Get-Mailbox $DisplayName -ErrorAction SilentlyContinue
$DisplayNameMailUser = Get-MailUser $DisplayName -ErrorAction SilentlyContinue
if ($DisplayNameMailbox -or $DisplayNameMailUser)
{
Write-Output "The Display Name specified already exists."
$DisplayName = $null
}
}
while (!$DisplayName)
{
$DisplayName = Read-Host -Prompt "Display Name"
if ($DisplayName)
{
$DisplayNameMailbox = Get-Mailbox $DisplayName -ErrorAction SilentlyContinue
$DisplayNameMailUser = Get-MailUser $DisplayName -ErrorAction SilentlyContinue
if ($DisplayNameMailbox -or $DisplayNameMailUser)
{
Write-Output "The Display Name specified already exists."
$DisplayName = $null
}
}
}
#Alias to lower
$Alias=$Alias.ToLower()
# Set UPN
$UPN=$Alias + $UPNDomain
Write-Output "Creating Shared Mailbox"
New-Mailbox -Name:$Alias -Alias:$Alias -DisplayName:$DisplayName -OrganizationalUnit:$OU -UserPrincipalName:$UPN -SamAccountName:$Alias -Database:$MailboxDatabase –Shared –DomainController $DomainController
Sleep 10
Write-Output "Creating Security Group"
New-ADGroup -Name "g.f.mail.$Alias" -SamAccountName g.f.mail.$Alias -GroupCategory Security -GroupScope Global -DisplayName "g.f.mail.$Alias" -Path "OU=Shared Mailboxes,OU=Groups,OU=Accounts,OU=Central,DC=domain,DC=lan" -Description "Group for shared mailbox $Alias"
Write-Output "Setting Mailbox Permissions"
sleep 50
Add-MailboxPermission –Identity: $Alias –AccessRights:FullAccess –user:"g.f.mail.$Alias"
Add-ADPermission –Identity: $Alias –user:"g.f.mail.$Alias" –ExtendedRights: 'Send-as'
Configure Protocol logging
By default protocol logging is not enabled on your send and receive connectors.
It is a pretty good idea to turn it on, at least on your internet send and receive connectors.
You could also turn it on on all your send and receive connectors, if there's no data sent over those connectors there will be nothing logged.
Disk space is the main criteria to implement protocol logging, and even that can be configured to your desires.
Protocol logging records the SMTP conversations that occur between e-mail servers as part of message delivery. These SMTP conversations occur on Send connectors and Receive connectors configured on servers running Microsoft Exchange Server 2010 that have the Hub Transport server role or the Edge Transport server role installed. You can use protocol logging to diagnose mail flow problems.
By default, protocol logging is disabled on all Send connectors and Receive connectors. Protocol logging is enabled or disabled on a per-connector basis. Other protocol logging options are set on a per-connector type basis for the whole server. All the Receive connectors on a Hub Transport server or an Edge Transport server share the same protocol log files and protocol log options. These protocol log files and protocol log options are separate from the Send connector protocol log files and protocol log options that are on the same server. By default, Exchange 2010 uses circular logging to limit the protocol logs based on file size and file age to help control the hard disk space used by the protocol log files.
Looking for other management tasks related to transport logs? Check out Managing Transport Logs.
© 2010 Microsoft Corporation. All rights reserved.
It is a pretty good idea to turn it on, at least on your internet send and receive connectors.
You could also turn it on on all your send and receive connectors, if there's no data sent over those connectors there will be nothing logged.
Disk space is the main criteria to implement protocol logging, and even that can be configured to your desires.
- You can configure the maximum number of days the logs are maintained.
- You can configure the maximum directory size.
- You can configure the maximum file size.
- You can configure the log file path.
Configure Protocol Logging
Exchange 2010
Applies to: Exchange Server 2010 SP3, Exchange Server 2010 SP2
Protocol logging records the SMTP conversations that occur between e-mail servers as part of message delivery. These SMTP conversations occur on Send connectors and Receive connectors configured on servers running Microsoft Exchange Server 2010 that have the Hub Transport server role or the Edge Transport server role installed. You can use protocol logging to diagnose mail flow problems.
By default, protocol logging is disabled on all Send connectors and Receive connectors. Protocol logging is enabled or disabled on a per-connector basis. Other protocol logging options are set on a per-connector type basis for the whole server. All the Receive connectors on a Hub Transport server or an Edge Transport server share the same protocol log files and protocol log options. These protocol log files and protocol log options are separate from the Send connector protocol log files and protocol log options that are on the same server. By default, Exchange 2010 uses circular logging to limit the protocol logs based on file size and file age to help control the hard disk space used by the protocol log files.
Looking for other management tasks related to transport logs? Check out Managing Transport Logs.
 Caution: Caution: |
|---|
| Don't perform this procedure on an Edge Transport server that has been subscribed to the Exchange organization by using EdgeSync. Instead, make the changes on the Hub Transport server. The changes are then replicated to the Edge Transport server next time EdgeSync synchronization occurs. |
You need to be assigned permissions before you can perform this procedure. To see what permissions you need, see the "Receive connectors" and "Send connectors" entries in the Transport Permissions topic.
- Perform one of the following steps:
- To modify an existing Receive connector on an Edge Transport server, in the console tree, select Edge Transport, and then in the work pane, click the Receive Connectors tab.
- To modify an existing Receive connector on a Hub Transport server, expand Server Configuration in the console tree, and select Hub Transport. In the result pane, select the server that has the Receive connector that you want to modify, and then click the Receive Connectors tab.
- In the work pane, select the Receive connector to modify.
- Under the name of the Receive connector in the action pane, click Properties to open the Properties page.
- Click the General tab and use the drop-down box next to Protocol logging level to enable or disable protocol logging. None disables protocol logging, and Verbose enables protocol logging.
- After you make your protocol logging selection, click Apply to save changes and remain on the Properties page, or click OK to save changes and exit the Properties page.
This example enables protocol logging for the Receive connector Connection from Contoso.com.
The procedure is similar for Send connectors. For Send connectors, you use the Set-SendConnector cmdlet.
For detailed syntax and parameter information, see Set-ReceiveConnector or Set-SendConnector.
Set-ReceiveConnector "Connection from Contoso.com" -ProtocolLoggingLevel Verbose
For detailed syntax and parameter information, see Set-ReceiveConnector or Set-SendConnector.
You need to be assigned permissions before you can perform this procedure. To see what permissions you need, see the "Hub Transport server" entry in the Transport Permissions topic.
A special Send connector named the intra-organization Send connector exists on every Hub Transport server. This connector is implicitly created, invisible, and requires no management. The intra-organization Send connector is used to relay messages to the following destinations:
This example enables protocol logging on the intra-organization Send connector on a Hub Transport server.
For detailed syntax and parameter information, see Set-TransportServer.
 Note: Note: |
|---|
| You can't use the EMC to enable or disable protocol logging for the intra-organization Send connector. |
- To other Hub Transport servers in the Exchange organization
- To Exchange Server 2003 servers in the Exchange organization
- To Edge Transport servers in the Exchange organization
This example enables protocol logging on the intra-organization Send connector on a Hub Transport server.
Set-TransportServer "Exchange01" -IntraOrgConnectorProtocolLoggingLevel Verbose
You need to be assigned permissions before you can perform this procedure. To see what permissions you need, see the "Hub Transport server" and "Edge Transport server" entries in the Transport Permissions topic.
By default, the Receive connector protocol log files are located at C:\Program Files\Microsoft\Exchange Server\V14\TransportRoles\Logs\ProtocolLog\SmtpReceive, and the Send connector protocol log files are located at C:\Program Files\Microsoft\Exchange Server\V14\TransportRoles\Logs\ProtocolLog\SmtpSend. The directory must be local to the Exchange 2010 computer.
By default, the Receive connector protocol log files are located at C:\Program Files\Microsoft\Exchange Server\V14\TransportRoles\Logs\ProtocolLog\SmtpReceive, and the Send connector protocol log files are located at C:\Program Files\Microsoft\Exchange Server\V14\TransportRoles\Logs\ProtocolLog\SmtpSend. The directory must be local to the Exchange 2010 computer.
- Perform one of the following steps:
- On a computer that has the Edge Transport server role installed, select Edge Transport, and then in the action pane, click the Properties link that's directly under the server name.
- On a computer that has the Hub Transport server role installed, in the console tree, expand Server Configuration, and select Hub Transport. In the action pane, click the Properties link that's directly under the server name.
- On the Properties page, click the Log Settings tab.
- In the Protocol log section, click Browse next to Receive connector protocol log file path.
- In the Browse for folder window, browse to the new location where you want to store the Receive connector protocol log files. If you want to create a folder, select a parent folder, click Make New Folder, and then type the name of the new folder. After you make your folder selection, click OK to close the Browse for folder window.
- Click Apply to save changes and remain on the Properties page, or click OK to save changes and exit the Properties page.
This example sets the Receive connector protocol log directory to C:\Receive SMTP Log on the Exchange 2010 computer Exchange01.
For detailed syntax and parameter information, see Set-TransportServer.
Set-TransportServer Exchange01 -ReceiveProtocolLogPath "C:\Receive SMTP Log"
- Perform one of the following steps:
- On a computer that has the Edge Transport server role installed, select Edge Transport, and then in the action pane, click the Properties link that's directly under the server name.
- On a computer that has the Hub Transport server role installed, in the console tree, expand Server Configuration, and select Hub Transport. In the action pane, click the Properties link that's directly under the server name.
- On the Properties page, click the Log Settings tab.
- In the Protocol log section, click Browse next to Send connector protocol log file path.
- In the Browse for folder window, browse to the new location where you want to store the Send connector protocol log files. If you want to create a folder, select a parent folder, click Make New Folder, and then type the name of the new folder. After you make your folder selection, click OK to close the Browse for folder window.
- Click Apply to save changes and remain on the Properties page, or click OK to save changes and exit the Properties page.
This example sets the Send connector protocol log directory to C:\Send SMTP Log on the Exchange 2010 computer Exchange01.
Setting the value of the SendProtocolLogPath parameter or ReceiveProtocolLogPath parameter to
For detailed syntax and parameter information, see Set-TransportServer.
Set-TransportServer Exchange01 -SendProtocolLogPath "C:\Send SMTP Log"
$null disables protocol logging for all Send connectors or all Receive connectors on the server. However, setting either of these parameters to $null when protocol logging is enabled for any Send connector, including the intra-organization Send connector, or Receive connector on the server generates event log errors. The preferred method of disabling protocol logging is to use the Set-SendConnector or Set-ReceiveConnector cmdlets to set the ProtocolLoggingLevel parameter to None. Also, you can use the Set-TransportServer cmdlet to set the IntraOrgProtocolLoggingLevel parameter to None.For detailed syntax and parameter information, see Set-TransportServer.
You need to be assigned permissions before you can perform this procedure. To see what permissions you need, see the "Hub Transport server" and "Edge Transport server" entries in the Transport Permissions topic.
By default, the maximum size for each protocol log file is 10 MB. All Receive connectors on the server share the same protocol log files, and all Send connectors on the server share the same protocol log files. When a protocol log file reaches its maximum size, Exchange 2010 opens a new protocol log file. This process continues until either of the following conditions is true:
This example sets the maximum size of Receive connector protocol log files to 20 MB on the Exchange 2010 computer Exchange01.
This example sets the maximum size of Send connector protocol log files to 20 MB on the Exchange 2010 computer Exchange01.
For detailed syntax and parameter information, see Set-TransportServer.
| Note: |
|---|
| You can't use the EMC to configure the maximum size of each protocol log file. |
- The protocol log directory reaches its specified maximum size. For more information about how to change the maximum size of the protocol log directory, see "Configure the maximum size of the protocol log directory" later in this topic.
- A protocol log file reaches its specified maximum age. For more information about how to change the maximum age of a protocol log file, see "Configure the maximum age of the protocol log files" later in this topic.
This example sets the maximum size of Receive connector protocol log files to 20 MB on the Exchange 2010 computer Exchange01.
Set-TransportServer Exchange01 -ReceiveProtocolLogMaxFileSize 20MB
Set-TransportServer Exchange01 -SendProtocolLogMaxFileSize 20MB
You need to be assigned permissions before you can perform this procedure. To see what permissions you need, see the "Hub Transport server" and "Edge Transport server" entries in the Transport Permissions topic.
By default, the maximum size for the protocol log directory is 250 MB. All Receive connectors on the server share the same protocol log directory, and all Send connectors on the server share the same protocol log directory. Circular logging deletes the oldest protocol log files when either of the following conditions is true:
This example sets the maximum size of the Send connector protocol log directory to 400 MB on the Exchange 2010 computer Exchange01.
For detailed syntax and parameter information, see Set-TransportServer.
| Note: |
|---|
| You can't use the EMC to configure the maximum size of the protocol log directory. |
- The protocol log directory reaches its specified maximum size.
- A protocol log file reaches its specified maximum age.
Set-TransportServer Exchange01 -ReceiveProtocolLogMaxDirectorySize 400MB
Set-TransportServer Exchange01 -SendProtocolLogMaxDirectorySize 400MB
You need to be assigned permissions before you can perform this procedure. To see what permissions you need, see the "Hub Transport server" and "Edge Transport server" entries in the Transport Permissions topic.
By default, the maximum age for any protocol log file is 30 days. All Receive connectors on the server share the same protocol log files, and all Send connectors on the server share the same protocol log files. Circular logging deletes the oldest protocol log files if either of the following conditions is true:
This example sets the age limit of the Send connector protocol log files to 45 days on the Exchange 2010 computer Exchange01.
To specify an age value, enter the value as a time span: dd.hh:mm:ss, where d = days, h = hours, m = minutes, and s = seconds. The valid input range for this parameter is from 00:00:00 through 24855.03:14:07. Setting the value of the ReceiveProtocolLogMaxAge parameter or the SendProtocolLogMaxAge parameter to
For detailed syntax and parameter information, see Set-TransportServer.
| Note: |
|---|
| You can't use the EMC to configure the maximum age of the protocol log files. |
- The protocol log directory reaches its specified maximum size.
- A protocol log file reaches its specified maximum age.
Set-TransportServer Exchange01 -ReceiveProtocolLogMaxAge 45.00:00:00
Set-TransportServer Exchange01 -SendProtocolLogMaxAge 45.00:00:00
00:00:00 prevents the automatic removal of protocol log files because of their age.For detailed syntax and parameter information, see Set-TransportServer.
02 December 2013
Change and publish ReportingURL for Lync 2010
Tried using the Lync reporting feature the other day, and found there was no URL published.

First check what the current URL is:
Get-CsService -MonitoringServer
Identity : MonitoringServer:sr-XXXXX.domain.lan
MonitoringDatabase : MonitoringDatabase:cl-XXXX-cg1
ReportingUrl :
DependentServiceList : {Registrar:lyncedc.domain.lan}
ServiceId : 2-MonitoringServer-1
SiteId : Site:FirstSite
PoolFqdn : sr-XXXXX.domain.lan
Version : 5
Role : MonitoringServer
Set new Url and publish:
Set-CsMonitoringServer -Identity "MonitoringServer:sr-XXXXX.domain.lan" -ReportingUrl http://sr-XXXXX/Reports_APPROD/Pages/Folder.aspx
Review your change:
Get-CsService -MonitoringServer
Identity : MonitoringServer:sr-XXXXX.domain.lan
MonitoringDatabase : MonitoringDatabase:cl-XXXXX-cg1
ReportingUrl : http://sr-XXXXX/Reports_APPROD/Pages/Folder.aspx
DependentServiceList : {Registrar:lyncedc.domain.lan}
ServiceId : 2-MonitoringServer-1
SiteId : Site:FirstSite
PoolFqdn : sr-XXXXX.domain.lan
Version : 5
Role : MonitoringServer
And now the URL is published:

26 November 2013
Tightening Exchange Server 2010 security
Here's a quick checklist to tighten the security of Exchange server 2010.
The full article can be found here:
Weak passwords
Leaving private data in public folders
Outlook Web Access and Outlook Web App
SMTP and POP3 access
Shared Exchange administrator accounts
Protecting Exchange 2010 users from spoofing
Exchange Server 2010 and Active Directory integration
Role Based Access Control (RBAC) in Exchange 2010
Client access server vulnerabilitiesProtecting Exchange Server 2010 with ForeFront
Information Rights Management protection in Exchange 2010 SP1
Addressing Outlook Web App 2010 security concernsPublic access security in OWA 2010
The full article can be found here:
Don’t overlook these Exchange security vulnerabilities
Gaps in the patching processWeak passwords
Leaving private data in public folders
Outlook Web Access and Outlook Web App
SMTP and POP3 access
Shared Exchange administrator accounts
Defending Exchange Server 2010 with native security tools
Transport security in Exchange 2010Protecting Exchange 2010 users from spoofing
Exchange Server 2010 and Active Directory integration
Role Based Access Control (RBAC) in Exchange 2010
Client access server vulnerabilitiesProtecting Exchange Server 2010 with ForeFront
Exchange Server 2010 post-deployment security checklist
All about Forefront Protection 2010 for Exchange
Deployment recommendations
Use the Forefront Protection 2010 for Exchange Server Capacity Planning Tool.
Use the Forefront Protection 2010 for Exchange Server Capacity Planning Tool.
Custom email filtering with Forefront Protection 2010 for Exchange
Exchange wildcard certificates: Do the benefits outweigh the risks?
Responding to Outlook Web App 2010 security concerns
Addressing Outlook Web App 2010 security concernsPublic access security in OWA 2010
Information Rights Management protection in Exchange 2010 SP1
Outlook Web App and IRM aggravations
Discussing Exchange Server security risks and vulnerabilities
Authenticating to Exchange 2010 via NTLM: Smart move or security risk?
Addressing Outlook Web App 2010 security concernsPublic access security in OWA 2010
Free Exchange add-on enhances native spam filtering
20 November 2013
Microsoft recommended Exchange 2010 settings but often forgotten
Set DAG network compression to enabled.
DAG network encryption
DAGs support the use of encryption by leveraging the encryption capabilities of the Windows Server operating system. DAGs use Kerberos authentication between Exchange servers. Microsoft Kerberos security support provider (SSP) EncryptMessage and DecryptMessage APIs handle encryption of DAG network traffic. Microsoft Kerberos SSP supports multiple encryption algorithms. (For the complete list, see section 3.1.5.2, "Encryption Types" of Kerberos Protocol Extensions). The Kerberos authentication handshake selects the strongest encryption protocol supported in the list: typically Advanced Encryption Standard (AES) 256-bit, potentially with a SHA Hash-based Message Authentication Code (HMAC) to maintain integrity of the data. For details, see HMAC.
Network encryption is a property of the DAG and not a DAG network. You can configure DAG network encryption using the Set-DatabaseAvailabilityGroup cmdlet in the Shell. The possible encryption settings for DAG network communications are shown in the following table.
DAG network communication encryption settings
| Setting | Description |
|---|---|
| Disabled | Network encryption isn't used. |
| Enabled | Network encryption is used on all DAG networks for replication and seeding. |
| InterSubnetOnly | Network encryption is used on DAG networks when replicating across different subnets. This is the default setting. |
| SeedOnly | Network encryption is used on all DAG networks for seeding only. |
Set-DatabaseAvailabilityGroup -identity (DAGName) -NetworkEncryption enabled
Set DAG network encryption to enabled.
DAG network compression
DAGs support built-in compression. When compression is enabled, DAG network communication uses XPRESS, which is the Microsoft implementation of the LZ77 algorithm. For details, see An Explanation of the Deflate Algorithm and section 3.1.4.11.1.2.1 "LZ77 Compression Algorithm" of Wire Format Protocol Specification. This is the same type of compression used in many Microsoft protocols, in particular, MAPI RPC compression between Microsoft Outlook and Exchange.
As with network encryption, network compression is also a property of the DAG and not a DAG network. You configure DAG network compression by using the Set-DatabaseAvailabilityGroup cmdlet in the Shell. The possible compression settings for DAG network communications are shown in the following table.
Return to top
As with network encryption, network compression is also a property of the DAG and not a DAG network. You configure DAG network compression by using the Set-DatabaseAvailabilityGroup cmdlet in the Shell. The possible compression settings for DAG network communications are shown in the following table.
DAG network communication compression settings
| Setting | Description |
|---|---|
| Disabled | Network compression isn't used. |
| Enabled | Network compression is used on all DAG networks for replication and seeding. |
| InterSubnetOnly | Network compression is used on DAG networks when replicating across different subnets. This is the default setting. |
| SeedOnly | Network compression is used on all DAG networks for seeding only. |
Set-DatabaseAvailabilityGroup -identity (DAGName)-NetworkCompression enabled
Configure Calendar Repair Assistant Settings.
The Calendar Repair Assistant (CRA) is a configurable mailbox assistant that runs within the Microsoft Exchange Mailbox Assistants service on Microsoft Exchange Server 2010 Mailbox servers. The CRA detects and corrects inconsistencies that occur in single and recurring calendar items for mailboxes that are homed on the Mailbox server that is running the CRA. The purpose of this process is to make sure that recipients won't miss meetings or have unreliable meeting information.
In Exchange 2010 Service Pack 1 (SP1), the CRA was changed from a time-based assistant to a throttle-based assistant.
By default, the CRA is not set to run automatically. To configure the CRA to run and repair calendar inconsistencies, use the set-mailboxserver cmdlet in the Exchange Management Shell to set the work cycle and work cycle checkpoint. The Exchange Management Console cannot be used to configure calendar repair log settings.
You must use the following Set-MailboxServer cmdlet parameters to configure the CRA settings:
- CalendarRepairIntervalEndWindow This parameter specifies the number of days into the future to repair calendars. For example, if this parameter is set to 90, the CRA repairs calendars on the Mailbox server 90 days from the date it was set. The default value is 30 days.
- CalendarRepairMissingItemFixDisabled This parameter specifies that the CRA won't fix missing attendee calendar items for mailboxes homed on this Mailbox server. If an attendee is missing a calendar item, the item will be re-created. The default value is
$false. - CalendarRepairWorkCycle and CalendarRepairWorkCycleCheckpoint These parameters work together. The CalendarRepairWorkCycle parameter specifies the time span in which all mailboxes on the specified server will be scanned by the CRA. For example, if you specify seven days for this parameter, the CRA will process all mailboxes on this server every seven days. Calendars that have inconsistencies will be flagged and repaired according to the interval specified by the CalendarRepairWorkCycleCheckpoint parameter. For example, if you specify one day for this parameter, the CRA will query every day for new mailboxes that require processing.
Get-MailboxServer -Identity (mailboxserver) | fl name,calendar*
Set to enabled:
Set-Mailboxserver -Identity (mailboxserver) -CalendarRepairMissingItemFixDisabled $false
Set the CRA to check all mailboxes on the server MAILBOXSERVER every seven days and to process all calendars that require repairs every day in that seven day cycle.
Set-MailboxServer -Identity (mailboxserver) -CalendarRepairWorkCycle 7.00:00:00 -CalendarRepairWorkCycleCheckpoint 1.00:00:00
Set the number of days into the future that the CRA validates calendars to 90 days on Mailbox server MBX02.
Set-MailboxServer -Identity MBX02 -CalendarRepairIntervalEndWindow 90
Offline address book is not associated with a particular mailbox store
The Microsoft® Exchange Best Practices Analyzer Tool queries the Active Directory® directory service to determine whether the msExchUseOAB attribute in the msExchPrivateMDB class has been configured to use a specific offline address book for a particular mailbox store on a database. The msExchPrivateMDB class determines the configuration on a private database. The value of the msExchUseOAB attribute determines the specific offline address book that a particular mailbox store uses, and is the distinguished name of the offline address list that the users will download. If the Exchange Server Analyzer finds that the value for the offline address book for the mailbox store on the database is missing, the Analyzer tool displays an error message.
In Exchange 2000 Server and later versions, an offline address list is associated with all the users who are contained in an information store. Microsoft® Office Outlook® 2003 and later versions use the offline address book to provide offline access to directory information from the global address list (GAL) and from other address lists. A missing value for the msExchUseOAB attribute causes offline address book errors for users in this information store. To view the current value for this attribute, use the following procedure.
To view the msExchUseOAB attribute in Active Directory
- Start the ADSI Edit tool. To do this, click Start, click Run, type adsiedit.msc, and then click OK. For more information about how to install or use ADSI Edit, see ADSI Edit (adsiedit.msc).
- Under the Configuration object, expand the following path:
- CN=Configuration,DC=contoso,DC=com
- CN=Services
- CN=Microsoft Exchange
- CN=<OrganizationName> (for example, First Organization)
- CN=Administrative Groups
- CN=Exchange Administrative Group
- CN=Servers
- CN=<ServerName>
- CN=InformationStore
- CN=<StorageGroupName> (for example, First Storage Group)
- In the details pane, right-click CN=Mailbox Database, and then click Properties.
Note Notice that msExchPrivateMDB appears in the Class column for this object. - On the Attribute Editor tab, click msExchUseOAB, and then click Edit.
- Note the value that appears in the Value box. For example:
- <not set> (when the value is not set)
- CN=Default Offline Address Book,CN=Offline Address Lists,CN=Address Lists Container,CN=First Organization,CN=Microsoft Exchange,CN=Services,CN=Configuration,DC=contoso,DC=com (when the value is set to the default offline address book)
To resolve this issue, associate the offline address book with a mailbox store by using the procedures below.
To associate the Offline Address Book with a particular mailbox store in Exchange 2007 or in Exchange Server 2010
- Start the Exchange Management Console.
- Expand Server Configuration, and then click Mailbox.
- In the details pane, click the Database Management tab.
- Under the appropriate storage group (for example, First Storage Group), right-click Mailbox Database, and then click Properties.
- Click the Client Settings tab, and then click Browse next to Offline address book.
- Click the appropriate offline address book, and then click OK two times.
DAG not in DAC mode.
Datacenter Activation Coordination Mode
Datacenter Activation Coordination (DAC) mode is a property setting for a database availability group (DAG). DAC mode is disabled by default and should be enabled for all DAGs with two or more members that use continuous replication. DAC mode shouldn't be enabled for DAGs in third-party replication mode unless specified by the third-party vendor.
If a catastrophic failure occurs that affects the DAG (for example, a complete failure of one of the datacenters), DAC mode is used to control the startup database mount behavior of a DAG. When DAC mode isn't enabled and a failure occurs that affects multiple servers in the DAG, and then when a majority of the DAG members are restored after the failure, the DAG will restart and attempt to mount databases. In a multi-datacenter configuration, this behavior could cause split brain syndrome, a condition that occurs when all networks fail, and DAG members can't receive heartbeat signals from each other. Split brain syndrome can also occur when network connectivity is severed between datacenters. Split brain syndrome is prevented by always requiring a majority of the DAG members (and in the case of DAGs with an even number of members, the DAG's witness server) to be available and interacting for the DAG to be operational. When a majority of the members are communicating, the DAG is said to have quorum.
For example, consider a scenario where the first datacenter contains two DAG members and the witness server, and the second datacenter contains two other DAG members. If the first datacenter loses power and you activate the DAG in the second datacenter (for example, by activating the alternate witness server in the second datacenter), if the first datacenter is restored without network connectivity to the second datacenter, the active databases within the DAG may enter a split brain condition.
How DAC mode works
DAC mode is designed to prevent split brain from occurring by including a protocol called Datacenter Activation Coordination Protocol (DACP). After a catastrophic failure, when the DAG recovers, it won't automatically mount databases even though the DAG has a quorum. Instead DACP is used to determine the current state of the DAG and whether Active Manager should attempt to mount the databases.
You might think of DAC mode as an application level of quorum for mounting databases. To understand the purpose of DACP and how it works, it's important to understand the primary scenario it's intended to handle. Consider the two-datacenter scenario. Suppose there is a complete power failure in the primary datacenter. In this event, all of the servers and the WAN are down, so the organization makes the decision to activate the standby datacenter. In almost all such recovery scenarios, when power is restored to the primary datacenter, WAN connectivity is typically not immediately restored. This means that the DAG members in the primary datacenter will power up, but they won’t be able to communicate with the DAG members in the activated standby datacenter. The primary datacenter should always contain the majority of the DAG quorum voters, which means that when power is restored, even in the absence of WAN connectivity to the DAG members in the standby datacenter, the DAG members in the primary datacenter have a majority and therefore have quorum. This is a problem because with quorum, these servers may be able to mount their databases, which in turn would cause divergence from the actual active databases that are now mounted in the activated standby datacenter.
DACP was created to address this issue. Active Manager stores a bit in memory (either a 0 or a 1) that tells the DAG whether it's allowed to mount local databases that are assigned as active on the server. When a DAG is running in DAC mode, each time Active Manager starts up the bit is set to 0, meaning it isn't allowed to mount databases. Because it's in DAC mode, the server must try to communicate with all other members of the DAG that it knows to get another DAG member to give it an answer as to whether it can mount local databases that are assigned as active to it. The answer comes in the form of the bit setting for other Active Managers in the DAG. If another server responds that its bit is set to 1, it means servers are allowed to mount databases, so the server starting up sets its bit to 1 and mounts its databases.
But when you recover from a primary datacenter power outage where the servers are recovered but WAN connectivity has not been restored, all of the DAG members in the primary datacenter will have a DACP bit value of 0; and therefore none of the servers starting back up in the recovered primary datacenter will mount databases, because none of them can communicate with a DAG member that has a DACP bit value of 1.
DAC mode for DAGs with two members
DAGs with two members have inherent limitations that prevent the DACP bit alone from fully protecting against application-level split brain syndrome. For DAGs with only two members, DAC mode also uses the boot time of the DAG's alternate witness server to determine whether it can mount databases on startup. The boot time of the alternate witness server is compared to the time when the DACP bit was set to 1.
- If the time the DACP bit was set is earlier than the boot time of the alternate witness server, the system assumes that the DAG member and witness server were rebooted at the same time (perhaps because of power loss in the primary datacenter), and the DAG member isn't permitted to mount databases.
- If the time that the DACP bit was set is more recent than the boot time of the alternate witness server, the system assumes that the DAG member was rebooted for some other reason (perhaps a scheduled outage in which maintenance was performed or perhaps a system crash or power loss isolated to the DAG member), and the DAG member is permitted to mount databases.
| Important: |
|---|
| Because the alternate witness server's boot time is used to determine whether a DAG member can mount its active databases on startup, you should never restart the alternate witness server and the sole DAG member at the same time. Doing so may leave the DAG member in a state where it can't mount databases on startup. If this happens, you must run the Restore-DatabaseAvailabilityGroup cmdlet on the DAG. This resets the DACP bit and permits the DAG member to mount databases. |
Other benefits of DAC mode
In addition to preventing split brain syndrome at the application level, DAC mode also enables the use of the built-in site resilience cmdlets used to perform datacenter switchovers. These include the following:
- Stop-DatabaseAvailabilityGroup
- Restore-DatabaseAvailabilityGroup
- Start-DatabaseAvailabilityGroup
Enabling DAC mode
DAC mode can be enabled only by using the Exchange Management Shell. Specifically, you can use the Set-DatabaseAvailabilityGroup cmdlet to enable and disable DAC mode, as illustrated in the following example.
Set-DatabaseAvailabilityGroup -Identity DAG2 -DatacenterActivationMode DagOnly
In the preceding example, the DAG DAG2 is enabled for DAC mode.
Configure Shadow Redundancy
Shadow redundancy in Microsoft Exchange Server 2010 provides a high availability mechanism for messages for the entire time that the messages are in transit. To learn more about shadow redundancy, see Understanding Shadow Redundancy. You can use the Exchange Management Shell to configure shadow redundancy in your organization.
Set-TransportConfig -ShadowRedundancyEnabled $true
Set-TransportConfig -ShadowHeartbeatTimeoutInterval 00:30:00
Set-TransportConfig -ShadowMessageAutoDiscardInterval 04:00:00
Set-ReceiveConnector "Custom App Receive Connector" -MaxAcknowledgementDelay 0
Enable Shadow Redundancy Promotion
To complete this procedure, you must have local administrator permissions on the Hub Transport server.
- Edit the Edgetransport.exe.config file. By default, this file is located in the C:\Program Files\Microsoft\Exchange Server\V14\Bin directory.
- In the Edgetransport.exe.config file, change the shadowredundancypromotionenabled key to true, and then save the changes.
- Restart the Microsoft Exchange Transport service (MSExchangeTransport.exe).
18 November 2013
Windows 2008 Scheduled tasks result codes
To trouble shoot your scripts started by the task scheduler, and trying to figure out why it doesn't work:
0 or 0x0: The operation completed successfully.
1 or 0x1: Incorrect function called or unknown function called.
2 or 0x2: File not found.
10 or 0xa: The environment is incorrect.
0x41300: Task is ready to run at its next scheduled time.
0x41301: Task is currently running.
0x41302: Task is disabled.
0x41303: Task has not yet run.
0x41304: There are no more runs scheduled for this task.
0x41306: Task is terminated.
0x8004130F: Credentials became corrupted HOTFIX available
0x8004131F: An instance of this task is already running.
0x800704DD: The service is not available (is 'Run only when an user is logged on' checked?)
0xC000013A: The application terminated as a result of a CTRL+C.
0xC06D007E: Unknown software exception.
12 November 2013
Check OWA page with login and report when fails
After the millionth time the helpdesk come complaining that OWA wasn't working, I made this script that checks the status of the OWA webpage by logging in and reporting back if the login attempt fails.
The script:
A few things are necessary;
login.txt: the user that logs in to OWA needs to have a mailbox and the password file needs to be generated every time the password is renewed.
# Check if Outlook Webapp is online
#
# Use the 3 lines below to generate an encrypted password file for the user that will be logging into the site for this script
# $MyPswd = "password"
# ConvertTo-SecureString $MyPswd -AsPlainText -Force | `
# ConvertFrom-SecureString | Out-File -FilePath "D:\Scripts\Login.txt"
$username = "domain\username" # user needs a mailbox
$password = Get-Content "D:\Scripts\Login.txt" | ConvertTo-SecureString
$cred = new-object -typename System.Management.Automation.PSCredential -argumentlist $username, $password
$logfile = "D:\Scripts\WebPageLoginResult.txt"
if (Test-Path($logfile))
{
remove-item $logfile
}
Test-OWAConnectivity -url https://webmail.domain.com/owa -MailboxCredential:(Get-credential $cred) | fl url,scenario,result | out-file $logfile
Test-OWAConnectivity -url https://webmail.domain.lan/owa -trustanysslcertificate -MailboxCredential:(Get-credential $cred) | fl url,scenario,result | out-file -append $logfile
$Body = Get-Content $logfile
Get-Content $logfile | where {$_ -match "skipped"} | foreach {Send-MailMessage -SmtpServer smtp.domain.lan -From OWA_Check@domain.com -To username@domain.com,username2@domain.com -Subject "Webmail is not working" -Body ( $Body | out-string )}
Get-Content $logfile | where {$_ -match "failed"} | foreach {Send-MailMessage -SmtpServer smtp.domain.lan -From OWA_Check@domain.com -To username@domain.com,username2@domain.com -Subject "Webmail is not working" -Body ( $Body | out-string )}
11 November 2013
Remove activesync devices not synced for 60 days or more
For Exchange 2010:
Get all devices not synced for 60days or more:
$DevicesToRemove = Get-ActiveSyncDevice -result unlimited | Get-ActiveSyncDeviceStatistics | where {$_.LastSuccessSync -le (Get-Date).AddDays("-60")}
Delete active sync devices from variable:
$DevicesToRemove | foreach-object {Remove-ActiveSyncDevice ([string]$_.Guid) -confirm:$false}
Remove Active sync device for specific user:
Get-ActiveSyncDevice -Mailbox "domain\username" | Remove-ActiveSyncDevice -Confirm:$true
And for Exchange 2013:
Get all devices not synced for 60days or more:
$DevicesToRemove = Get-MobileDevice -ResultSize unlimited | Get-MobileDeviceStatistics | where {$_.LastSuccessSync -le (Get-Date).AddDays("-60")}
Delete active sync devices from variable:
$DevicesToRemove | foreach-object {Remove-MobileDevice ([string]$_.Guid) -confirm:$false}
Remove Active sync device for specific user:
Get-Mobile -Mailbox "domain\username" | Remove-MobileDevice -Confirm:$true
06 November 2013
Outlook web access opens in "Light mode" by default on Windows 8.1
If you upgraded to Windows 8.1 and tried to access Outlook Web App with the new Internet Explorer 11, you probably noticed that the “Use the light version of Outlook Web App” checkbox is checked and disabled on the login page:

That means that IE11 is willing to render only the basic version of OWA which was originally designed to target legacy browsers. This is quite embarassing, because IE11 is a really modern browser even in the preview!
The solution is to force IE to render OWA in compatibility mode. You can add the site to the compatibility list in the Tools –> Compatibility View Settings dialog:

This didn’t solve my problem, because only top-level domains can be added to this list, but I could take the advantage of the fact that according to the first checkbox, intranet sites are by default rendered in compatibility view. So I added my OWA URL to the list of sites in the Intranet Zone in the Tools –> Internet Options –> Security –> Local intranet –> Sites –> Advanced dialog.
According to some forum posts, the same issue arises with Office 365 and some popular websites like GitHub as well.
Source
04 November 2013
This attachment was removed
After applying a file extension filter in Forefront Protection for Exchange 2010 we got complaints about .PDF, LNK, and .ZIP files not getting through.
The attachment would be removed and replace by a text file with the line "This attachment was removed" in it.
The first thing that attracts attention is the line "This attachment was removed".
This is not the standard text we configured in Forefront so it comes from another source.
Turns out after a standard install of Exchange 2010 (Edge) server, under water there is also a file filter active: "Attachment Filtering agent"
You can see this after running:
Get-AttachmentFilterEntry |fl
Type : ContentType
Name : application/x-msdownload
Identity : ContentType:application/x-msdownload
Type : ContentType
Name : message/partial
Identity : ContentType:message/partial
Type : ContentType
Name : text/scriptlet
Identity : ContentType:text/scriptlet
Type : ContentType
Name : application/prg
Identity : ContentType:application/prg
Type : ContentType
Name : application/msaccess
Identity : ContentType:application/msaccess
Type : ContentType
Name : text/javascript
Identity : ContentType:text/javascript
Type : ContentType
Name : application/x-javascript
Identity : ContentType:application/x-javascript
Type : ContentType
Name : application/javascript
Identity : ContentType:application/javascript
Type : ContentType
Name : x-internet-signup
Identity : ContentType:x-internet-signup
Type : ContentType
Name : application/hta
Identity : ContentType:application/hta
Type : FileName
Name : *.xnk
Identity : FileName:*.xnk
Type : FileName
Name : *.wsh
Identity : FileName:*.wsh
Type : FileName
Name : *.wsf
Identity : FileName:*.wsf
Type : FileName
Name : *.wsc
Identity : FileName:*.wsc
Type : FileName
Name : *.vbs
Identity : FileName:*.vbs
Type : FileName
Name : *.vbe
Identity : FileName:*.vbe
Type : FileName
Name : *.vb
Identity : FileName:*.vb
Type : FileName
Name : *.url
Identity : FileName:*.url
Type : FileName
Name : *.shs
Identity : FileName:*.shs
Type : FileName
Name : *.shb
Identity : FileName:*.shb
Type : FileName
Name : *.sct
Identity : FileName:*.sct
Type : FileName
Name : *.scr
Identity : FileName:*.scr
Type : FileName
Name : *.scf
Identity : FileName:*.scf
Type : FileName
Name : *.reg
Identity : FileName:*.reg
Type : FileName
Name : *.prg
Identity : FileName:*.prg
Type : FileName
Name : *.prf
Identity : FileName:*.prf
Type : FileName
Name : *.pif
Identity : FileName:*.pif
Type : FileName
Name : *.pcd
Identity : FileName:*.pcd
Type : FileName
Name : *.ops
Identity : FileName:*.ops
Type : FileName
Name : *.mst
Identity : FileName:*.mst
Type : FileName
Name : *.msp
Identity : FileName:*.msp
Type : FileName
Name : *.msi
Identity : FileName:*.msi
Type : FileName
Name : *.psc2
Identity : FileName:*.psc2
Type : FileName
Name : *.psc1
Identity : FileName:*.psc1
Type : FileName
Name : *.ps2xml
Identity : FileName:*.ps2xml
Type : FileName
Name : *.ps2
Identity : FileName:*.ps2
Type : FileName
Name : *.ps11xml
Identity : FileName:*.ps11xml
Type : FileName
Name : *.ps11
Identity : FileName:*.ps11
Type : FileName
Name : *.ps1xml
Identity : FileName:*.ps1xml
Type : FileName
Name : *.ps1
Identity : FileName:*.ps1
Type : FileName
Name : *.msc
Identity : FileName:*.msc
Type : FileName
Name : *.mdz
Identity : FileName:*.mdz
Type : FileName
Name : *.mdw
Identity : FileName:*.mdw
Type : FileName
Name : *.mdt
Identity : FileName:*.mdt
Type : FileName
Name : *.mde
Identity : FileName:*.mde
Type : FileName
Name : *.mdb
Identity : FileName:*.mdb
Type : FileName
Name : *.mda
Identity : FileName:*.mda
Type : FileName
Name : *.lnk
Identity : FileName:*.lnk
Type : FileName
Name : *.ksh
Identity : FileName:*.ksh
Type : FileName
Name : *.jse
Identity : FileName:*.jse
Type : FileName
Name : *.js
Identity : FileName:*.js
Type : FileName
Name : *.isp
Identity : FileName:*.isp
Type : FileName
Name : *.ins
Identity : FileName:*.ins
Type : FileName
Name : *.inf
Identity : FileName:*.inf
Type : FileName
Name : *.hta
Identity : FileName:*.hta
Type : FileName
Name : *.hlp
Identity : FileName:*.hlp
Type : FileName
Name : *.fxp
Identity : FileName:*.fxp
Type : FileName
Name : *.exe
Identity : FileName:*.exe
Type : FileName
Name : *.csh
Identity : FileName:*.csh
Type : FileName
Name : *.crt
Identity : FileName:*.crt
Type : FileName
Name : *.cpl
Identity : FileName:*.cpl
Type : FileName
Name : *.com
Identity : FileName:*.com
Type : FileName
Name : *.cmd
Identity : FileName:*.cmd
Type : FileName
Name : *.chm
Identity : FileName:*.chm
Type : FileName
Name : *.bat
Identity : FileName:*.bat
Type : FileName
Name : *.bas
Identity : FileName:*.bas
Type : FileName
Name : *.asx
Identity : FileName:*.asx
Type : FileName
Name : *.app
Identity : FileName:*.app
Type : FileName
Name : *.adp
Identity : FileName:*.adp
Type : FileName
Name : *.ade
Identity : FileName:*.ade
As shown above, the attachments .ZIP, .LNK, and .PDF are not shown.
Problem is that the attachment gets identified as an "invalid attachment" by the "Attachment Filtering agent".
Solutions;
Disable-TransportAgent -Identity "Attachment Filtering agent"
Restart-Service MSExchangeTransport
Or:
1.Stop the Microsoft Exchange Transport service.
2.Locate the EdgeTransport.exe.config file. This file is located in the following path:
drive:\Program Files\Microsoft\Exchange Server\Bin\
3.Add the following entry between the <appSettings> element and the </appSettings> element of the EdgeTransport.exe.config file:
<add key="AllowInvalidAttachment" value="true" />
4.Restart the Microsoft Exchange Transport service.
Source 1
Source 2
Subscribe to:
Posts (Atom)