Starting from Service Pack 1, Windows 2008 R2 and Windows 7 finally has a built-in tool to reduce the size of the Windows Side-by-Side DLL repository and free up some GBs on your server storage. This tool is DISM.exe.
The procedure is the following:
Install Windows Service Pack 1 then ...
Start and elevated command prompt (run 'CMD' as administrator) and ...
Run the DISM command, which replaces the old VSP1CLN and COMPCLN we used on previous Windows versions:
DISM.exe /online /Cleanup-Image /spsuperseded
Wait 10 minutes before the task completes ( it ends with “Service Pack Cleanup operation completed. The operation completed successfully”)
Normally you should have been able to reduce the Winsxs folder size by 1 or maybe 2 GBs, sometimes more. Saved space may vary a lot.
Just know that after using DISM you will not be able to uninstall the Service Pack 1 anymore.
Let's have a look at the used switches for DISM.exe:
The /online switch tells DISM to work on the running OS installation
The /spsuperseded option removes the backup files created during installation.
Optionally you could use the /hidesp option which will remove SP1 (KB976932) from the “Installed Updates” section of Programs and Features, to ensure that users do not try to uninstall the Service Pack.
About: Exchange 2013-2016-2019-Online - Powershell - Windows 2012-2016-2019 - Teams - Office365 - PKI - Microsoft365
12 February 2013
11 February 2013
Exchange 2010 SP1 Password Reset Tool
Now that SP1 for Exchange 2010 is released, it is time to start exploring
some of the new features. The first in line is the newly release password reset
tool (this was also included in Exchange 2007 SP3).
This has been a long awaited feature since OWA has been in use. For users
that primarily use OWA for email access or are primarily remote access users,
administrators have always struggled with resetting user’s password that will
force users to change at first logon. Also users have struggled with
remembering to reset their passwords through OWA before the password expired
since their was no warning integrated with OWA.
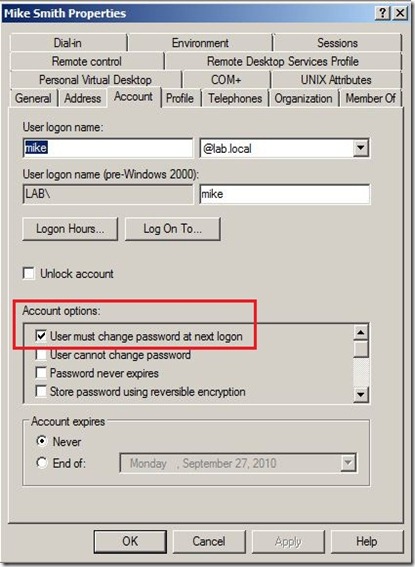
The following is the setting within the user account that forces the user to change their password at next logon:
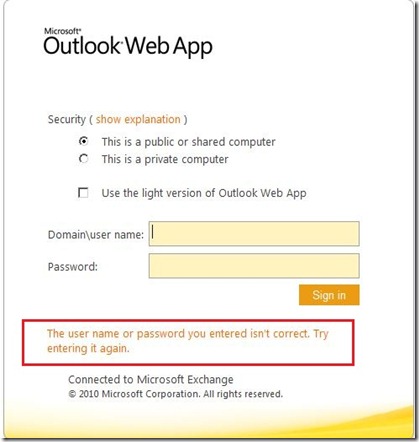
When a user tried to login to OWA with an expired password or configured to change their password at next logon, the user would see the following error: “The user name or password you entered isn’t correct. Try entering it again”
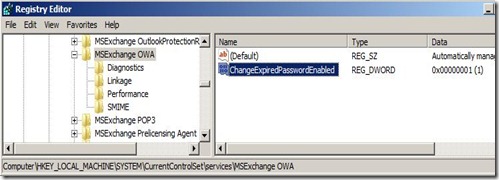
The Password Reset Tool feature is not active by default. To activate this feature within Exchange 2010 SP1 (or Exchange 2007 SP3), all that is needed is one registry key:
HKLM\SYSTEM\CurrentControlSet\Services\MSExchange OWA
Create DWORD: ChangeExpiredPasswordEnabled with value: 1
After creating the registry entry, an IISReset must be performed. Now under the same scenario, if a user is configured to change their password at next logon or if their password has expired, the user will see the new message: “Your password has expired and you need to change it before you sign in to Outlook Web App.”
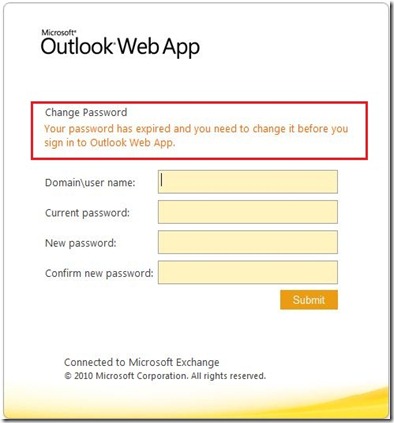
Now the user can change their password before logging into OWA:
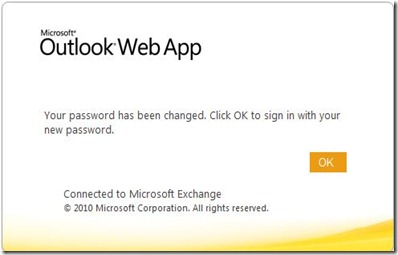
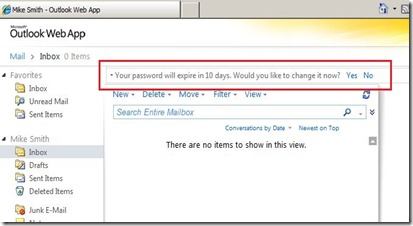
But that is not all…If a user’s password is set to expire within 14 days, a user will see a warning while they are logged into OWA and will have the option to reset their password:
Source
The following is the setting within the user account that forces the user to change their password at next logon:

When a user tried to login to OWA with an expired password or configured to change their password at next logon, the user would see the following error: “The user name or password you entered isn’t correct. Try entering it again”

The Password Reset Tool feature is not active by default. To activate this feature within Exchange 2010 SP1 (or Exchange 2007 SP3), all that is needed is one registry key:
HKLM\SYSTEM\CurrentControlSet\Services\MSExchange OWA
Create DWORD: ChangeExpiredPasswordEnabled with value: 1

After creating the registry entry, an IISReset must be performed. Now under the same scenario, if a user is configured to change their password at next logon or if their password has expired, the user will see the new message: “Your password has expired and you need to change it before you sign in to Outlook Web App.”

Now the user can change their password before logging into OWA:

But that is not all…If a user’s password is set to expire within 14 days, a user will see a warning while they are logged into OWA and will have the option to reset their password:

Source
08 February 2013
Brand OWA 2007 and 2010 with the Server Name
How to Brand OWA 2007, 2010 and 2013 with the Server Name
If your Exchange 2007 or Exchange 2010 and 2013 environment includes more that one CAS server, it's sometimes helpful to know which one a client is connecting to. Environments with more that one CAS usually use some form of hardware or software load balancing, making it difficult to troubleshoot OWA issues.
A relatively easy way to do this is to brand each CAS server's OWA logon page with the server name. This way, end-users are able to provide the server name if they run into problems.
For Exchange 2007, navigate to C:\Program Files\Microsoft\Exchange Server\ClientAccess\owa\auth folder and open the logon.aspx file using Notepad.
Add either of the two edits shown in the screenshot below:
Adding the server name as highlighted above in blue will add the server name "invisibly" below the logon screen. To view the server name, click anywhere on the screen and press CTRL-A to select all. You can then see the server name, as shown below:
For Exchange 2010, navigate to the C:\Program Files\Microsoft\Exchange Server\V14\ClientAccess\Owa\auth folder and open the logon.aspx file using Notepad.
Add the server name, as shown in the screenshot below:
This will add the server name to the logon screen, as shown below:
A relatively easy way to do this is to brand each CAS server's OWA logon page with the server name. This way, end-users are able to provide the server name if they run into problems.
For Exchange 2007, navigate to C:\Program Files\Microsoft\Exchange Server\ClientAccess\owa\auth folder and open the logon.aspx file using Notepad.
Add either of the two edits shown in the screenshot below:
Adding the server name as highlighted above in red will visibly add the server name to the logon screen, as shown below:
For Exchange 2010, navigate to the C:\Program Files\Microsoft\Exchange Server\V14\ClientAccess\Owa\auth folder and open the logon.aspx file using Notepad.
Add the server name, as shown in the screenshot below:
This will add the server name to the logon screen, as shown below:
For Exchange 2013, navigate to the C:\Program Files\Microsoft\Exchange Server\V15\FrontEnd\HttpProxy\owa\auth folder and open the logon.aspx file using Notepad. In my example i used Notepad++ so you can see the line number.
On line 272 add: <p><span style="color: #ffffff;">servername</span></p>
Edit:
I added a personal touch to the 2010 option, at the very end of the logon.aspx page add the line:
<p><span style="color: #ffffff;">SERVERNAME</span></p>
This line will be invisible on the loginpage until you select ctrl + a.
Important Note: These edits are overwritten anytime an Exchange Server update is applied to the CAS servers. This is because every update includes a complete reinstallation of the Exchange binaries, and the logon.aspx file you edited will be overwritten.
Typically, the logon.aspx page rarely changes, so you can usually make a copy of it after you've made your edits and copy it back after the update. However, there are no guarantees that the file will not be changed by an update. If so, you will need to re-edit the logon.aspx file.
07 February 2013
Best Practice for RPC Timeouts in Exchange
Exchange 2010 and 2007 use RPC (Remote Procedure Calls) for all client and RPC proxy calls. For example, email clients (Outlook, Outlook Anywhere (OA), and ActiveSync) use RPC for MAPI connectivity.
The default keep alive time for RPC connections uses the IIS idle connection timeout, which is 15 minutes. This usually doesn't cause a problem on local LAN or WAN connections, but routers and switches that are used to connect Internet clients to internal Exchange servers often have more aggressive timeouts. Typically these network devices have a 5 minute timeout which causes problems for external clients, particularly Outlook Anywhere, iPhone, and iPad clients. Symptoms include messages stuck in the Outbox and poor email performance on the remote clients, and high CPU utilization on the Exchange Client Access Servers (CAS).
The new best practice is to adjust the RPC keep alive timeout value on the Client Access Server from 15 minutes to 2 minutes. Since RPC is a function of Windows, not Exchange, this value is adjusted under the Windows NT registry key. The value is located here:
Normally the MinimumConnectionTimeout DWORD value does not exist, which means RPC uses the default value of 900 seconds (15 minutes). To adjust it, create or modify the MinimumConnectionTimeout value and set the value to decimal 120 (seconds, or 2 minutes). IIS must be restarted on the CAS to affect the change.
The following command will create the appropriate values:
The Outlook and ActiveSync clients honor this new timeout during the connection to the CAS, so both client and server now send a Keep-Alive packet after two minutes of inactivity, effectively maintaining both TCP connections needed.
A colleague of mine works for a large global company that was affected by this. They have several thousand iPads connecting to nine load balanced CAS servers and all the CAS were peaking at 100% CPU utilization. Once they implemented this change the average load on the CAS is now 20-30% and the iPad performance is much improved.
This is my new best practice and I make this change on every Exchange CAS deployment. For more information about RPC over HTTP see Configuring Computers for RPC over HTTP on TechNet.
Source
The default keep alive time for RPC connections uses the IIS idle connection timeout, which is 15 minutes. This usually doesn't cause a problem on local LAN or WAN connections, but routers and switches that are used to connect Internet clients to internal Exchange servers often have more aggressive timeouts. Typically these network devices have a 5 minute timeout which causes problems for external clients, particularly Outlook Anywhere, iPhone, and iPad clients. Symptoms include messages stuck in the Outbox and poor email performance on the remote clients, and high CPU utilization on the Exchange Client Access Servers (CAS).
The new best practice is to adjust the RPC keep alive timeout value on the Client Access Server from 15 minutes to 2 minutes. Since RPC is a function of Windows, not Exchange, this value is adjusted under the Windows NT registry key. The value is located here:
HKLM\Software\Policies\Microsoft\Windows NT\RPC\MinimumConnectionTimeout
Normally the MinimumConnectionTimeout DWORD value does not exist, which means RPC uses the default value of 900 seconds (15 minutes). To adjust it, create or modify the MinimumConnectionTimeout value and set the value to decimal 120 (seconds, or 2 minutes). IIS must be restarted on the CAS to affect the change.
The following command will create the appropriate values:
reg add "HKLM\Software\Policies\Microsoft\Windows NT\RPC" -v "MinimumConnectionTimeout" -t REG_DWORD -d 120
The Outlook and ActiveSync clients honor this new timeout during the connection to the CAS, so both client and server now send a Keep-Alive packet after two minutes of inactivity, effectively maintaining both TCP connections needed.
A colleague of mine works for a large global company that was affected by this. They have several thousand iPads connecting to nine load balanced CAS servers and all the CAS were peaking at 100% CPU utilization. Once they implemented this change the average load on the CAS is now 20-30% and the iPad performance is much improved.
This is my new best practice and I make this change on every Exchange CAS deployment. For more information about RPC over HTTP see Configuring Computers for RPC over HTTP on TechNet.
Source
Outlook Anywhere RPC over HTTP
Symptoms:
Attempting to ping RPC endpoint 6001 (Exchange Information Store) on server server.contoso.com.
The attempt to ping the endpoint failed.
Additional Details An RPC error was thrown by the RPC Runtime process.
Error 1818 CallCancelled
Source
On the Mailbox servers: a DWORD entry needs to be created on each Mailbox server named "Do Not Refer HTTP to DSProxy" at HKLM\System\CCS\Services\MSExchangeSA\Parameters\ and the value set to "1".
Next, as indicated earlier, the RPCProxy will block access to the DC servers unless there servers are included in the ValidPorts regkey.
So, set the following on the Client Access Servers:
1.The ValidPorts setting at HKLM\Software\Microsoft\RPC\RPCProxy needs setting so that the entries referring to 6004 point to DC servers in addition to the mailbox server.
2.The PeriodicPollingMinutes key at HKEY_LOCAL_MACHINE\System\CurrentControlSet\Services\MSExchangeServiceHost\RpcHttpConfigurator\ needs setting to zero to prevent RpcHttpConfigurator from updating the Valid Ports key automatically.
Finally, you need to make sure that the DCs are listening on port 6004:
On the Global Catalog servers: a REG_MULTI_SZ entry needs to be created on each GC named NSPI interface protocol sequences at HKLM\System\CCS\Services\NTDS\Parameters\ and the value set to ncacn_http:6004.
There is 1 last thing to deal with in this SSL-ID load balanced configuration.
Outlook profile creation hard codes a call to DSProxy on 6004.
Which means that we can get split connectivity during profile creation.
To deal with this minimal volume of traffic, there is 1 final regkey that should be set on the mailbox servers:
On the Mailbox Servers - set the HKLM\System\CCS\Services\MSExchangeSA \Parameters key "NSPI Target Server" to the FQDN of the DC that profile creation should use.
By using only 1 DC for profile creation, all DSProxy calls will be proxied into that single DC, once again avoiding split connectivity.
Source
Subscribe to:
Posts (Atom)


